Right. So, I've been promising a tutorial for a while now. This one provides maximum satisfaction for minimal dificulty.
Supplies:
• a stencil-worthy design
• clear (or somewhat low-opacity) plastic sheeting
• cutting board or mat
• x-acto knife
• permanent marker
• ruler (optional)
Step 1: Make (or find) an awesome design.
Keep in mind the basic tenets of stencil-making — balance of positive and negative space, avoiding design elements that are so narrow or fussy the paint won't be able to get through, and being careful not to cut away so much that the physical structure of the stencil itself is compromised.
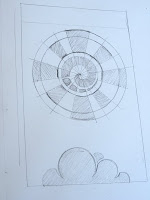
I'm going with a super-simple sunshine, because I'm tired of gloomy wintertime. You can see how sloppy the initial sketch is, but that doesn't matter much, as long as it's easy to tell what my final outlines are going to be.
Step 2: Trace the design onto the plastic.
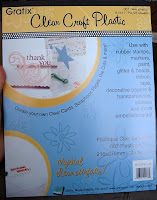
This is the plastic that I make all my stencils from. It's as clear as the transparencies they used to use on overhead projectors in school, but it's quite a bit thicker, so it'll be sturdy. I got this 25-sheet pack for about $4 at Michael's.
Usually I'll scotch-tape the plastic down onto my sketchbook to hold it steady while I trace it. Sometimes, though, I use a digital design I made on the computer, so I hold the sheet up against my monitor and (very carefully) trace it straight off of there. 
I usually also take the time to fully color in the bits I'm going to be cutting away; you'd be surprised how easy it is to accidentally cut out the wrong piece and ruin the whole thing. Plus, the sweet coloring sensation is very therapeutic for one's inner child.
Step 3: Cut it out! 
This is the time-consuming part — especially if you're like me and haven't changed the blade on your X-acto in about three years.
Even if your knife is as sharp as the Vorpal Sword, getting through that plastic can blister your fingers. Here are some tips to make it less painful:
• Cut it one half at a time. Score the plastic on the front side, then flip the stencil over and score it again on the back. At this point your blade should readily slice all the way through. This way is easier than trying to force the knife all the way through on the first go, which is bad for your knife, bad for your fingerpads, and bad for your stencil since it increases the chances of accidentally tearing the plastic.
Front side cut; ready to cut back side. --->
• Cut the smaller shapes out first. Every piece you cut out weakens the stencil overall and increases the risk of tearing the plastic; take care of the tiny, fussy shapes first, while they still have the full support of the unbroken sheet.
• Use a ruler for straight lines. This may seem like a no-brainer, but it makes enough of a difference that I feel it's important to mention.
• If you have some really big bits to cut out, you can use scissors. They're a lot faster, but they also make it much easier to stretch, warp, or rip the plastic. Use scissors with narrow blades, like those designed for cutting hair, if possible. I also strongly suggest making a pilot hole with a knife before you use scissors.
• Be careful and go slowly.
Step 4: Finishing

Trim the margins of your stencil if desired. Remember that it's a good idea to leave a little more extra plastic around the edges than seems necessary. This helps prevent spillover paint from getting on your substrate (the thing you're stenciling) where you don't want it.
As you can see in this picture and the one previous, the plastic tends to warp around the edges of the cuts, from the friction of the knife. I STRONGLY recommend flattening your new stencil out before using it — I usually just lay my Webster's on top of it for 15 minutes to an hour, which seems to work just fine.
Extra Tips
• Use spraypaint outside.
• If, like me, you roll on your paint with a roller brush, thin layers of paint work much better than thick ones, which can seep under the stencil and botch up your nice crisp lines. • Always wash a stencil after using it. Paint buildup can flake off when you least want it to and ruin your latest project.
• Store stencils flat. I keep mine in a folder, but laying them flat on a shelf will work just as well.
• Take care when storing stencils (or taking them out of storage) that they don't snag on each other. Ripping a stencil isn't fun, and simultaneously ripping two or more SUCKS.
• Don't stencil something that isn't yours unless you get the owner's permission. ;)


